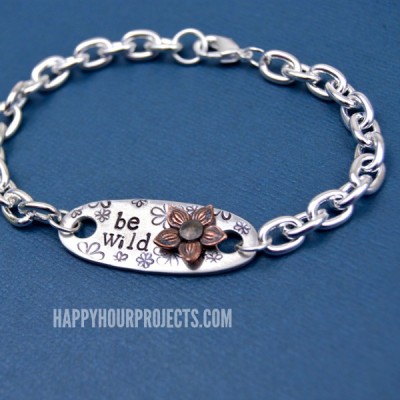
I got the chance over the long weekend to sit down and stamp… oh man, it’s seriously one of my favorite things. One of the pieces I made was this floral themed bracelet with a sweet riveted accent. I stamped “be wild”, going for a wildflower look, and today I’ll share a quick rundown of how to make a stamped and riveted bracelet like this.
I’ll include links below to the products I used in today’s stamped bracelet project. They’re affiliate links, which means if you decide you want to click through and make a purchase, it supports my blog at no extra cost to you (and thank you, by the way).
- Bench block and hammer
- ImpressArt 6mm Whimsy Flower design stamp and ImpressArt 3mm Whimsy Flower design stamp
- ImpressArt 3mm lowercase Newsprint font
- ImpressArt SoftStrike 1 3/8 inch oval pewter blank
- Permanent marker and polishing pad
- 2-Hole Punch (3/32 inch)
- TierraCast Rivetable flower
- 4mm TierraCast compression rivet
- 4mm Rivet Setting Tool
- 6 inches 6mm chain, 7mm jump rings, and lobster clasp
- Jewelry pliers
First, stamp your blank. I’m not going to get too heavy into detail on this step, because I have a fully detailed beginner’s metal stamping tutorial that you will want to check out if you’re thinking about getting started metal stamping. If you’re already somewhat familiar, then this is a piece of cake!
I prefer to use stamp straight tape or washi tape to line up my letters, and I work from left to right when I stamp, personally. I know that some people -refer to work from the center outward, or from the outer edges toward the center. All ways of stamping are correct, as long as you’re patient, confident, and you give the end of each stamp a single firm tap. Letters are a bit simpler than larger design stamps, but this blank is made of pewter, which is a soft metal that stamps beautifully, even if you’re a beginner.
Next, determine the placement of your floral accent, and punch a 3/32″ hole in the blank to accommodate it. The screw-down hole punch is easy to use – you can mark a dot on your blank, line it up through the hole at the bottom, and screw the punch down until it pierces the metal. Then, just unscrew it and you’re ready for the next step.
I thought my blank looked a little… well, blank. I’m noticing more and more that I like more detail – more shapes, more textures – not just words, a lot of the time. So I used large and small floral stamps around the empty spaces, and then darkened the impressions with a permanent marker. To do this, just color inside each impression, and use a polish pad on the surface to remove the excess ink. It stays in the impressions, and buffs away off the top of the blank.
Next, I riveted. This is something you will want to do on a steel block, but I had my eyelet setting block out already, so that’s why the photo shows a different base. The center circle where I’m working it still made of hardened steel – you don’t want to just try to set a rivet on your table.
Compression rivets are easy, so don’t be intimidated! You just stack up whatever you’d like to rivet together, push the post up through the back of your piece, and snap the cap on top. Position the concave setting tool on top of the cap, and tap the end of the tool firmly with your hammer until it compresses and your pieces are set.
Finally, assemble your bracelet using 3 inches of chain on either side. I took a bit of a shortcut here, and used a charm link bracelet. I laid it out, and cut 1 3/8″ of chain out from the center of the bracelet, leaving me two lengths of chain about 3 inches each, with the clasp still attached to the ends. Connect the chains with jump rings, twisting them open and closed again with your jewelry pliers.
You can of course use 3 inches of bulk chain on each side, and connect a ring and a lobster clasp to the ends after completing your bracelet. When it comes to jewelry-making, there are often several ways to finish off a piece, and you can give it your own flair by choosing a heavier or more delicate chain, beads, multiple strands – you get the idea! I was going for simple today, and this is a piece that I can wear with other bracelets.
Thanks for joining me for today’s stamped metal bracelet!


